This is the full developer documentation for hance
# Skill Commands
> Detailed reference for each /hance subcommand.
The `/hance` skill routes to one of six subcommands based on what you ask for.
## `/hance setup`
[Section titled “/hance setup”](#hance-setup)
Verifies your environment is ready: checks for Bun (or Node as fallback), FFmpeg, and shows example commands. Use this the first time you run hance from your AI agent.
```plaintext
> /hance setup
```
## `/hance run`
[Section titled “/hance run”](#hance-run)
Apply a specific preset to a single file. The simplest path: name a look and a file.
```plaintext
> /hance run portra-400 on my-video.mp4
> /hance run cinestill-800t sunset.mov
```
## `/hance try`
[Section titled “/hance try”](#hance-try)
Explore looks for a file. The agent picks 3 candidate presets, renders still previews, and opens a side-by-side comparison UI in your browser so you can pick your favourite and fine-tune it.
```plaintext
> /hance try a warm 70s look on sunset.mp4
> /hance try some looks for interview.mov
```
You can also provide a reference image to match:
```plaintext
> /hance try match this reference photo.jpg on my-video.mp4
```
## `/hance refine`
[Section titled “/hance refine”](#hance-refine)
Perfect a single look on a single file. Where `try` explores options for you to pick from, `refine` takes one direction and dials it in — adjusting effects like grain, halation, vignette, white balance, and split tone on top of a base preset. The agent iterates on a still preview, judging each render against your intent, then offers to apply the result and save it as a reusable preset.
```plaintext
> /hance refine portra-400 on sunset.jpg, classic film but less punchy
> /hance refine the surf shot — add grain and a teal-orange split tone
> /hance refine match the warmth of this reference.jpg
```
See [Grading workflow](/docs/agent/grading/) for how the agent evaluates and tunes a look.
## `/hance batch`
[Section titled “/hance batch”](#hance-batch)
Apply one preset to multiple files at once.
```plaintext
> /hance batch apply portra-400 to everything in ./footage
> /hance batch cinestill-800t clip*.mp4
```
Note
Batch processing requires a pro license. On the free tier, process one file at a time. See [Free vs Pro](/docs/free-vs-pro/).
## `/hance ui`
[Section titled “/hance ui”](#hance-ui)
Open the browser-based editor for interactive preview and tweaking.
```plaintext
> /hance ui
> /hance ui video.mp4
```
# Grading workflow
> How an AI agent evaluates and dials in a film look with hance.
When you ask an agent to make a shot “look like film,” it doesn’t apply a preset and stop. Through the `/hance refine` command it works the way a colorist does: render, look, adjust, repeat. It judges its own output against your intent. This page explains what’s happening so you know what to ask for.
## The loop
[Section titled “The loop”](#the-loop)
The agent renders a **still** preview (never a full video while iterating), reads the result, names what’s wrong, changes a knob or two, and re-renders. Suspected artifacts get inspected at 1:1. It stops when the frame reads as film, then offers to apply the look to the whole file and save it as a reusable preset.
## What “film” usually means
[Section titled “What “film” usually means”](#what-film-usually-means)
A preset applied raw can look punchy and digital. A convincing film look usually adds:
* **Lifted blacks** so shadows aren’t pure digital black.
* **Highlight rolloff** for a gentle shoulder instead of clipped whites.
* **Restrained saturation.** Oversaturation is the most common digital tell.
* **Grain** for texture.
* **Halation**, a soft glow bleeding from highlights.
* **A subtle vignette** to frame the subject.
## Split tone, and matching mood
[Section titled “Split tone, and matching mood”](#split-tone-and-matching-mood)
A complementary split tone (warm highlights, cool teal shadows, the classic “teal-orange”) gives action, landscape, and city shots cinematic separation. But it fights warm, intimate scenes like a sunset portrait, which want consistent warmth instead. Part of refining is matching the toning to the mood rather than applying it everywhere.
## What to ask for
[Section titled “What to ask for”](#what-to-ask-for)
Be specific about the direction and let the agent handle the knobs:
```plaintext
> /hance refine portra-400 on sunset.jpg, classic film but less punchy
> /hance refine the surf shot, warmer, more grain, slightly stronger vignette
> /hance refine match the look of this reference.jpg
```
When the agent has tuned a preset rather than used it stock, it will say so. The look is “portra-400, tuned,” and it can save your tuned version under its own name.
# Overview
> Use hance with an AI agent to describe the look you want in plain English.
Hance ships with an [AI agent skill](https://www.skills.sh/) that lets you grade footage using natural language. No CLI knowledge needed. Describe the look you want and the agent handles the rest.
## Install the skill
[Section titled “Install the skill”](#install-the-skill)
Install via [skills.sh](https://skills.sh):
```bash
npx skills add orva-studio/hance
```
Once installed, type `/hance` in your AI agent to get started.
The skill is also baked into the `hance` binary itself. Any agent harness can pull the same instructions at runtime — version-matched to the installed CLI, no separate install — via `hance skills`:
```bash
hance skills # the router / entry doc
hance skills list # available subcommand + reference docs
hance skills get refine # print one doc
hance skills path # extract the docs to a local dir
```
## How it works
[Section titled “How it works”](#how-it-works)
The skill uses `bunx @orva-studio/hance` (or `npx` as fallback) under the hood, so no global install is needed. It automatically detects your runtime and picks the fastest available runner.
## Subcommands
[Section titled “Subcommands”](#subcommands)
The `/hance` skill routes to one of six subcommands based on what you ask for. See the [Skill Commands](/docs/agent/commands/) page for full details.
| Command | Description |
| --------------- | ---------------------------------------------------- |
| `/hance setup` | Verify your environment is ready |
| `/hance run` | Apply a preset to a single file |
| `/hance try` | Explore and compare looks in a browser UI |
| `/hance refine` | Dial in one look on one file, iterating on a preview |
| `/hance batch` | Apply one preset to multiple files |
| `/hance ui` | Open the browser-based editor |
## Machine-readable docs
[Section titled “Machine-readable docs”](#machine-readable-docs)
These docs are published in formats built for LLMs and agents:
* **[`/llms.txt`](/llms.txt)**: an index of the documentation, following the [llms.txt convention](https://llmstxt.org/), with links to every page.
* **Plain Markdown**: append `.md` to any page URL to fetch its raw Markdown (frontmatter stripped). For example, this page is available at `/agent/overview.md`.
Point your agent at `/llms.txt` to let it discover and pull in the relevant pages on demand.
# Architecture
> How hance is built: monorepo structure, FFmpeg codec I/O, GPU rendering, and IPC.
Hance is a Bun workspaces monorepo with five packages:
| Package | Purpose |
| --------------- | --------------------------------------------------------------------------------- |
| `packages/core` | Pure TypeScript effect/preset/arg logic and the shared WGSL shaders |
| `packages/cli` | The compiled `hance` binary entry point |
| `packages/gpu` | Render orchestration: drives the sidecar, runs the image pipeline, handles export |
| `packages/ui` | Browser-based interactive preview |
| `packages/wgpu` | Rust wgpu sidecar binary |
## How a frame flows (CLI render)
[Section titled “How a frame flows (CLI render)”](#how-a-frame-flows-cli-render)
When you render from the CLI, hance is not a pure-GPU tool: FFmpeg handles the codec work at both ends, and the GPU handles the pixels in between. `@hance/gpu` orchestrates the round trip for both video and image inputs.
```
flowchart TB
cmd["$ hance <input>"] --> cli["packages/cli (parse args)"]
cli -->|build render params| core["@hance/core (effects, presets, WGSL shaders)"]
cli -->|start render: input + params| gpu["@hance/gpu (orchestrator)"]
core -.->|params| gpu
core -.->|WGSL shaders| sidecar[wgpu sidecar]
gpu -->|spawns| decode[FFmpeg decode]
decode -->|raw RGBA frames| gpu
gpu <-->|"IPC: JSON init + RGBA"| sidecar
gpu -->|graded RGBA frames| encode[FFmpeg encode]
encode --> output[Output file]
classDef pkg color:#e8843c;
class cli,core,gpu,sidecar pkg;
```
## How a frame flows (browser UI preview)
[Section titled “How a frame flows (browser UI preview)”](#how-a-frame-flows-browser-ui-preview)
The browser UI preview is a separate path. It loads the media into an `` element and uploads it straight into a WebGPU texture, so previewing an image never touches FFmpeg. Crucially it loads the **same `@hance/core` WGSL shaders** as the CLI sidecar, so the preview matches the final render.
```
flowchart TB
media["<img> / <video> element"] -->|WebGPU texture| uir["@hance/ui renderer"]
core["@hance/core WGSL shaders"] -.->|same shaders| uir
uir --> canvas[Canvas preview]
classDef pkg color:#e8843c;
class uir,core pkg;
```
## GPU rendering
[Section titled “GPU rendering”](#gpu-rendering)
Effects are rendered on the GPU via the native Rust [wgpu](https://wgpu.rs) sidecar. The WGSL shaders in `packages/core` are shared between the browser preview and the Rust sidecar, so what you see in `hance ui` is exactly what you get from the CLI.
## IPC protocol
[Section titled “IPC protocol”](#ipc-protocol)
The sidecar communicates with the Bun process over stdin/stdout using a length-prefixed JSON init message followed by raw RGBA frames. This keeps the orchestration lightweight while offloading pixel work to the GPU.
## Codec I/O
[Section titled “Codec I/O”](#codec-io)
`@hance/gpu` shells out to FFmpeg to decode the input into raw RGBA frames (`-f rawvideo -pix_fmt rgba`) and to encode the processed frames back into the output container. `ffmpeg` and `ffprobe` must be on your `PATH`. The GPU work happens entirely between decode and encode, so there are no intermediate files.
## Processing pipeline
[Section titled “Processing pipeline”](#processing-pipeline)
Every file passes through the same effect chain:
1. Input LUT (log → Rec.709 conversion, e.g. V-Log, skipped unless set)
2. Color grading (exposure, contrast, white balance, saturation, fade)
3. Halation (highlight glow)
4. Chromatic aberration (lens fringing)
5. Bloom (soft light diffusion)
6. Film grain
7. Vignette
8. Split toning
9. Camera shake
The optical effects (halation, chromatic aberration, bloom, grain, and vignette) run in **linear light** (the chain is bracketed by sRGB↔linear conversions, with 16-bit float intermediates) so glows and blurs spread physically correct energy. Color grading, split toning, and camera shake stay in perceptual (gamma) space.
All effects compose into a single GPU render graph, with no intermediate files and no re-encoding chains.
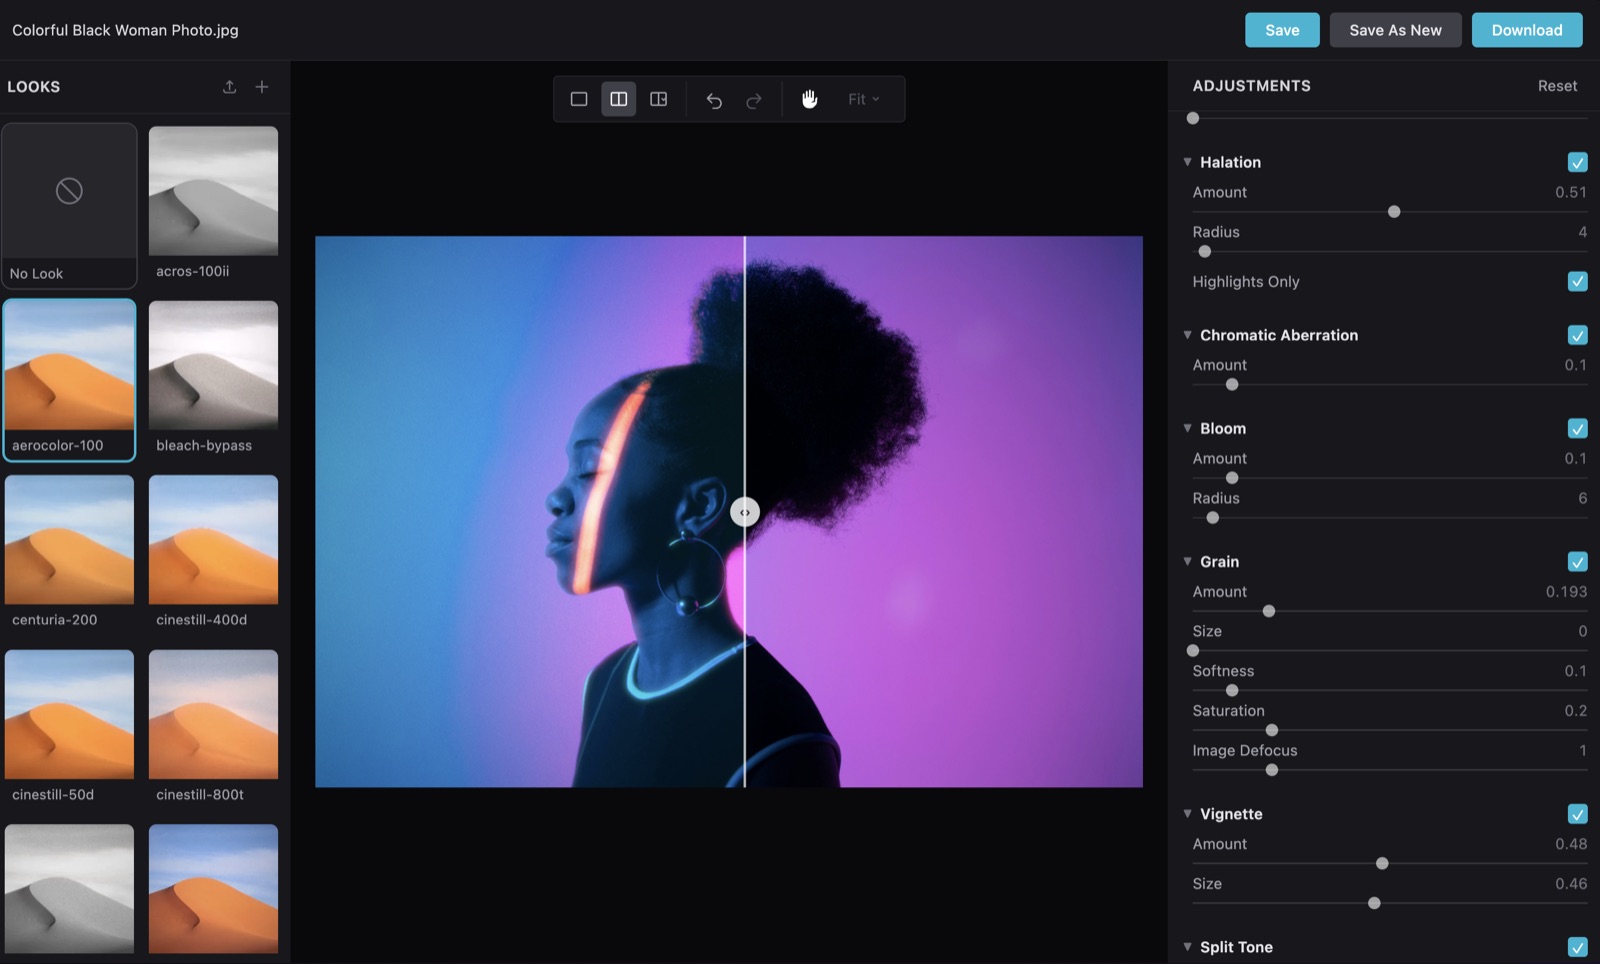
# Browser UI
> Full tour of the hance browser-based editor: panels, view modes, and export.
The hance browser-based editor previews looks in real-time on your footage, rendering effects on the GPU via WebGPU. This page documents every panel and feature.
## Launching
[Section titled “Launching”](#launching)
```bash
hance ui # open http://localhost:4800 in your browser
hance ui path/to/video.mp4 # launch with a file preloaded
hance ui --port 5000 # use a custom port
hance ui --no-open # start the server without opening a browser
```
Using an AI agent? The [`/hance ui`](/docs/agent/overview/) skill command opens the editor too: `/hance ui my-video.mp4`.
## Upload & preview
[Section titled “Upload & preview”](#upload--preview)
Drag and drop a video or image into the editor, or pass a file path when launching. The preview updates in real-time as you adjust parameters.
The preview is rendered at a reduced resolution for smooth, real-time interaction. It does not limit the quality of what you export:
* **Images** preview at up to **1920×1080** (1080p), preserving aspect ratio. Export re-renders at the full source resolution (see [Export](#export)).
* **Videos** play back through the browser’s native player. Formats the browser cannot decode, notably **ProRes**, are transcoded to an H.264 proxy capped at **720p / 30fps** purely for preview. Playback begins within about a second and the rest of the clip streams in while transcoding continues. Seeking is limited to the portion loaded so far until the transcode finishes, after which the whole clip is seekable. The proxy is never used for export; exporting always re-renders from your original file.
Note
ProRes (and similar professional or intermediate codecs) cannot be played by web browsers, so hance generates a lightweight H.264 proxy on upload. It streams in progressively so you can start previewing almost immediately. This only affects what you see in the editor, not your final render.
### Clearing the preview cache
[Section titled “Clearing the preview cache”](#clearing-the-preview-cache)
To avoid re-transcoding the same footage, hance caches each H.264 preview proxy on disk, keyed by the file’s name, size, and modified time. Re-uploading the same file is detected from that metadata alone, so it loads instantly from the cache with no re-upload or transcode. The cache is never cleared automatically, so it can grow over time. When it passes 5 GB the editor shows a one-off warning.
The proxies live in your system temp directory under `hance-proxy`. Your operating system usually clears the temp directory on reboot, but you can remove them at any time:
```bash
# macOS / Linux
rm -rf "${TMPDIR:-/tmp}/hance-proxy"
# Windows (PowerShell)
Remove-Item -Recurse -Force "$env:TEMP\hance-proxy"
```
Deleting the cache only removes preview proxies. It never touches your original footage, and the next upload simply rebuilds the proxy it needs.
## Looks panel
[Section titled “Looks panel”](#looks-panel)
Browse and apply any of the 40+ built-in film stock looks. Click a look to preview it instantly on your footage. Each look shows a thumbnail preview so you can compare at a glance.
## Adjustments panel
[Section titled “Adjustments panel”](#adjustments-panel)
Fine-tune every effect parameter with sliders. All the same controls available on the CLI (colour, halation, bloom, grain, vignette, split tone, aberration, and camera shake), grouped into collapsible sections.
## View modes
[Section titled “View modes”](#view-modes)
Switch between three view modes to evaluate your grade:
* **Normal**: full-screen preview of the graded result
* **Split**: side-by-side comparison of the original and graded frames
* **Reference**: compare against a reference image
## Timeline
[Section titled “Timeline”](#timeline)
For video files, a timeline scrubber lets you navigate through your footage and preview the look at any point. Frame-accurate seeking so you can check how the grade looks across different scenes.
## Undo / redo
[Section titled “Undo / redo”](#undo--redo)
Full undo/redo history for parameter changes. Experiment freely; you can always step back.
## Zoom & pan
[Section titled “Zoom & pan”](#zoom--pan)
Zoom into your footage to inspect grain, halation, and other fine details at pixel level. Multiple zoom levels available, plus a pan mode for navigating zoomed-in frames.
## Save & create looks
[Section titled “Save & create looks”](#save--create-looks)
Save your current settings as a new `.hlook` file directly from the UI. Saved looks appear in the looks panel and can be used from the CLI with `--preset `.
## Export
[Section titled “Export”](#export)
Export your graded video or image from the editor. Choose codec, quality, and export preset: the same options available on the CLI.
Note
Images export at the **full resolution of the source**, not the downscaled preview. The effects are re-rendered at native size on export. Very large sources are bounded by your GPU’s maximum texture size; if there isn’t enough GPU memory, the export reports an error rather than silently downscaling.
# Commands
> All hance CLI commands and global options.
## `hance ` |
| `--codec` | Output codec: `h264`, `h265`, `prores` | `h264` |
| `--encode-preset` | FFmpeg preset: `fast`, `medium`, `slow` | `medium` |
| `--crf` | Quality (0–51, lower is better; ignored for ProRes) | `18` |
| `--export` | Export quality preset: `low`, `medium`, `high`, `max` | none |
| `--blend` | Blend with original (0–1) | `1` |
### Presets
[Section titled “Presets”](#presets)
| Flag | Description | Default |
| ---------- | ------------------------ | --------- |
| `--preset` | Load a look file by name | `default` |
### General
[Section titled “General”](#general)
| Flag | Description |
| ----------------- | ------------------ |
| `--no-config` | Ignore config file |
| `--help`, `-h` | Show help |
| `--version`, `-v` | Print version |
## `hance ui [file] [options]`
[Section titled “hance ui \[file\] \[options\]”](#hance-ui-file-options)
Launch the browser-based editor.
```bash
hance ui
hance ui video.mp4
hance ui --port 8080 --no-open
```
| Flag | Description | Default |
| ----------- | -------------------------------- | ------------- |
| `--port` | Server port | `4800` |
| `--no-open` | Don’t open browser automatically | opens browser |
## `hance preview `
[Section titled “hance preset \”](#hance-preset-subcommand)
Manage looks/presets.
## `hance skills [subcommand]`
[Section titled “hance skills \[subcommand\]”](#hance-skills-subcommand)
Print the agent skill docs baked into the binary, so an AI harness gets version-matched instructions at runtime.
```bash
hance skills # the router / entry doc (for AI harnesses)
hance skills list # available subcommand + reference docs
hance skills get refine # print one doc
hance skills path # extract the docs to a local dir
```
## Batch processing
[Section titled “Batch processing”](#batch-processing)
Pass multiple inputs to process them in sequence:
```bash
hance clip1.mp4 clip2.mp4 clip3.mp4 -o graded/
```
Batch processing requires a pro license.
# Config File
> Set persistent defaults with .hancerc.json.
Instead of passing the same flags every time, save them in a config file.
## Config locations
[Section titled “Config locations”](#config-locations)
Hance checks two locations, in order:
1. **Local**: `.hancerc.json` in the current directory (or any parent directory)
2. **Global**: `~/.config/hance/config.json`
The first one found wins. CLI flags always override config values.
## Format
[Section titled “Format”](#format)
The config file is a JSON object where keys are flag names (without `--`):
```json
{
"preset": "portra-400",
"grain-amount": 0.2,
"no-camera-shake": true,
"codec": "h264",
"crf": 20
}
```
Boolean flags like `no-camera-shake` should be set to `true`.
## Example: project defaults
[Section titled “Example: project defaults”](#example-project-defaults)
Create a `.hancerc.json` in your project root to share settings across a team:
```json
{
"preset": "cinestill-800t",
"export": "high"
}
```
## Ignoring the config
[Section titled “Ignoring the config”](#ignoring-the-config)
Skip config file loading with:
```bash
hance video.mp4 --no-config
```
# Effects
> All effect parameters and their defaults.
Every effect is enabled by default and can be disabled with `--no-`. Parameters can be overridden individually.
## Input LUT
[Section titled “Input LUT”](#input-lut)
A pre-grade LUT applied as the very first pass, before color grading. Use it to convert flat log footage to Rec.709 so the rest of the chain works on a normal (un-flattened) image.
| Flag | Values | Default | Description |
| ------------- | ---------------- | -------- | -------------------------------------------------- |
| `--input-lut` | `rec709`, `vlog` | `rec709` | Input color profile |
| `--vlog` | boolean | off | Shorthand for `--input-lut vlog` (Panasonic V-Log) |
`rec709` is a pass-through and adds no processing. Disable explicitly with `--no-input-lut`.
## Color settings
[Section titled “Color settings”](#color-settings)
Control the base color grade applied before any optical effects.
| Flag | Range | Default | Description |
| ------------------- | ----------- | ------- | --------------------------- |
| `--exposure` | -2 to 2 | `0` | Exposure adjustment |
| `--contrast` | 0–3 | `1` | Contrast multiplier |
| `--highlights` | -1 to 1 | `0` | Highlight compression |
| `--fade` | 0–1 | `0` | Fade / lift blacks |
| `--white-balance` | 1000–15000 | `6500` | Color temperature in Kelvin |
| `--tint` | -100 to 100 | `0` | Green-magenta tint |
| `--subtractive-sat` | 0–3 | `1` | Subtractive saturation |
| `--richness` | 0–3 | `1` | Color richness |
| `--bleach-bypass` | 0–1 | `0` | Bleach bypass amount |
Disable with `--no-color-settings`.
## Halation
[Section titled “Halation”](#halation)
Simulates the glow that occurs when bright light passes through film emulsion and reflects off the base. The warm edge ring emerges from per-channel (R/G/B) scatter recombined in linear light; there is no tint colour to set.
| Flag | Range | Default | Description |
| ---------------------------- | ------- | ------- | ---------------------- |
| `--halation-amount` | 0–1 | `0.25` | Halation strength |
| `--halation-radius` | 1–100 | `4` | Blur radius |
| `--halation-highlights-only` | boolean | `true` | Restrict to highlights |
Disable with `--no-halation`.
## Chromatic aberration
[Section titled “Chromatic aberration”](#chromatic-aberration)
Simulates lens color fringing at frame edges.
| Flag | Range | Default | Description |
| -------------- | ----- | ------- | ----------------- |
| `--aberration` | 0–1 | `0.3` | Aberration amount |
Disable with `--no-aberration`.
## Bloom
[Section titled “Bloom”](#bloom)
Soft light diffusion that wraps around bright areas.
| Flag | Range | Default | Description |
| ---------------- | ----- | ------- | -------------- |
| `--bloom-amount` | 0–1 | `0.25` | Bloom strength |
| `--bloom-radius` | 1–100 | `10` | Blur radius |
Disable with `--no-bloom`.
## Grain
[Section titled “Grain”](#grain)
Adds organic film grain.
| Flag | Range | Default | Description |
| -------------------- | ----- | ------- | ------------------------- |
| `--grain-amount` | 0–1 | `0.125` | Grain intensity |
| `--grain-size` | 0–5 | `0` | Particle size |
| `--grain-softness` | 0–1 | `0.1` | Grain softness |
| `--grain-saturation` | 0–1 | `0.3` | Color saturation of grain |
| `--grain-defocus` | 0–5 | `1` | Image defocus amount |
Disable with `--no-grain`.
## Vignette
[Section titled “Vignette”](#vignette)
Darkens the edges of the frame.
| Flag | Range | Default | Description |
| ------------------- | ----- | ------- | ----------------- |
| `--vignette-amount` | 0–1 | `0.25` | Vignette strength |
| `--vignette-size` | 0–1 | `0.25` | Vignette size |
Disable with `--no-vignette`.
## Split tone
[Section titled “Split tone”](#split-tone)
Applies color toning to shadows and highlights.
| Flag | Range | Default | Description |
| ------------------------------- | -------------------------- | --------- | ---------------------- |
| `--split-tone-mode` | `natural`, `complementary` | `natural` | Toning mode |
| `--split-tone-amount` | 0–1 | `0` | Toning amount |
| `--split-tone-hue` | 0–360 | `20` | Hue angle in degrees |
| `--split-tone-pivot` | 0–1 | `0.3` | Shadow/highlight pivot |
| `--split-tone-protect-neutrals` | boolean | `false` | Protect neutral colors |
Disable with `--no-split-tone`. Note: split tone amount defaults to `0`, so it’s effectively off unless you set it.
## Camera shake
[Section titled “Camera shake”](#camera-shake)
Adds subtle motion for a handheld feel.
| Flag | Range | Default | Description |
| ----------------------- | ----- | ------- | --------------- |
| `--camera-shake-amount` | 0–1 | `0.25` | Shake intensity |
| `--camera-shake-rate` | 0–2 | `0.5` | Shake speed |
Disable with `--no-camera-shake`.
# Export Presets
> Quick quality presets for different output needs.
Export presets are shortcuts that configure codec, CRF, and encoding speed in one flag:
```bash
hance video.mp4 --export high
```
## Available presets
[Section titled “Available presets”](#available-presets)
| Preset | Use case |
| -------- | ------------------------------- |
| `low` | Quick previews, small file size |
| `medium` | Balanced quality and size |
| `high` | High quality, larger files |
| `max` | Maximum quality |
`high` and `max` print a warning about larger file sizes.
## Overriding export presets
[Section titled “Overriding export presets”](#overriding-export-presets)
You can override individual settings on top of an export preset:
```bash
hance video.mp4 --export high --codec prores
hance video.mp4 --export medium --crf 20
```
Explicit `--codec`, `--crf`, and `--encode-preset` flags take precedence over the export preset values.
## Pro codecs
[Section titled “Pro codecs”](#pro-codecs)
ProRes and H.265 codecs require a pro license. Using `--export` levels that select these codecs will fail on the free tier.
# Output Quality
> Choosing the right codec and quality settings for your output.
By default, hance encodes output as H.264 with CRF 18. If your source is a high-quality format like ProRes (common with `.mov` files from cameras or editing software), the default H.264 output will be lower quality than the original due to lossy compression and 4:2:0 chroma subsampling.
## Codec comparison
[Section titled “Codec comparison”](#codec-comparison)
| Codec | Quality | File Size | Compatibility |
| ---------------- | ---------------------------- | ----------------------- | ----------------------- |
| `h264` (default) | Good (CRF-dependent) | Smallest | Universal |
| `h265` | Better at same CRF | \~30% smaller than h264 | Most modern players |
| `prores` | Near-lossless (4:2:2 10-bit) | Largest | macOS, editing software |
## Examples
[Section titled “Examples”](#examples)
```bash
# ProRes output (near-lossless, 4:2:2 10-bit, larger files)
hance video.mov -o output.mov --codec prores
# Lower CRF for higher-quality H.264 (0 = lossless)
hance video.mov -o output.mp4 --crf 8
# H.265 for better quality at similar file sizes
hance video.mov -o output.mp4 --codec h265 --crf 12
```
## Pro codecs
[Section titled “Pro codecs”](#pro-codecs)
ProRes and H.265 require a pro license. On the free tier, H.264 is the only available codec.
# Free vs Pro
> What's included in the free tier and what requires a pro license.
Hance works out of the box on the free tier. Pro unlocks additional codecs, batch processing, and premium looks.
Note
Pro is **coming soon**. The features below outline what a pro license will include. It’s not yet available for purchase.
## Feature comparison
[Section titled “Feature comparison”](#feature-comparison)
| Feature | Free | Pro |
| ------------------------------------------------- | ---- | --- |
| All effects (color, halation, bloom, grain, etc.) | ✓ | ✓ |
| 40+ built-in film stock looks | ✓ | ✓ |
| Custom `.hlook` files | ✓ | ✓ |
| Browser UI (`hance ui`) | ✓ | ✓ |
| Config file (`.hancerc.json`) | ✓ | ✓ |
| H.264 codec | ✓ | ✓ |
| H.265 codec | ✓ | ✓ |
| ProRes codec | — | ✓ |
| Batch processing (multiple inputs) | — | ✓ |
| Premium looks | — | ✓ |
| AI depth of field (coming soon) | — | ✓ |
| DaVinci Resolve plugin (coming soon) | — | ✓ |
| Mac app (coming soon) | — | ✓ |
## Pro codecs
[Section titled “Pro codecs”](#pro-codecs)
The free tier supports H.264 and H.265 output. Pro unlocks:
* **ProRes**: near-lossless 4:2:2 10-bit output for professional editing workflows
Using a pro codec on the free tier will show an error:
```plaintext
Codec "prores" requires a pro license — upgrade at hance.video/pro
```
## Export presets and codecs
[Section titled “Export presets and codecs”](#export-presets-and-codecs)
Some export presets select pro codecs automatically:
| Export preset | Codec | Tier required |
| ------------- | ------ | ------------- |
| `low` | H.264 | Free |
| `medium` | H.264 | Free |
| `high` | H.265 | Free |
| `max` | ProRes | Pro |
You can override the codec on any export preset with `--codec h264` to stay on the free tier:
```bash
hance video.mp4 --export high --codec h264
```
## Batch processing
[Section titled “Batch processing”](#batch-processing)
Processing multiple files in one command requires a pro license:
```bash
# Pro only
hance clip1.mp4 clip2.mp4 clip3.mp4 -o graded/
# Or use a glob pattern
hance clip*.mp4 -o graded/
```
On the free tier, process one file at a time.
## Premium looks
[Section titled “Premium looks”](#premium-looks)
Some looks in the `presets/premium/` directory require a pro license. These are marked with `"premium": true` in the `.hlook` file.
## AI depth of field
[Section titled “AI depth of field”](#ai-depth-of-field)
Pull focus after the shot. AI estimates scene depth from a flat clip so you can deepen or soften the background. Coming soon as part of Pro.
## DaVinci Resolve plugin
[Section titled “DaVinci Resolve plugin”](#davinci-resolve-plugin)
The hance look engine inside Resolve as an OFX plugin, so there’s no round-trip through the CLI. Coming soon as part of Pro.
# Hance vs Alternatives
> How hance compares to Colourlab AI, Dehancer, and FilmBox.
There are several tools for adding film looks to video. Here’s how hance stacks up.
## Feature comparison
[Section titled “Feature comparison”](#feature-comparison)
| | Hance | Colourlab AI | Dehancer | FilmBox |
| ----------------------------------------------------------- | -------------- | ------------ | ---------- | ---------- |
| **CLI, scriptable & batchable** | ✓ | — | — | — |
| **Runs without an NLE** | ✓ | ✓ | — | — |
| **Browser-based UI** | ✓ | — | — | — |
| **AI agent integration** | ✓ | — | — | — |
| **AI auto-grading / shot match** | — | ✓ | — | — |
| **Film stock emulation** | 40+ looks | Neural Looks | 60+ stocks | 90+ stocks |
| **Optical effects** (halation, bloom, aberration, vignette) | ✓ | — | ✓ | — |
| **Film grain** | ✓ | ✓ (Pro) | ✓ | ✓ |
| **Camera shake** | ✓ | — | — | — |
| **Split toning** | ✓ | — | — | — |
| **Pricing** | Free / $49 Pro | $15/mo+ | $99–$399 | $89–$129 |
| **NLE plugin** (Premiere, Resolve, etc.) | — | ✓ | ✓ | ✓ |
## When to use hance
[Section titled “When to use hance”](#when-to-use-hance)
* You want to apply film looks **without opening an NLE**: process clips from the terminal and import them already graded.
* You need **batch automation**: script it, cron it, or plug it into a CI/ingest pipeline.
* Your editor **doesn’t support plugins**: CapCut, iMovie, ScreenFlow, and browser-based editors have no plugin system. Hance works upstream of any editor.
* You want a **single tool** that combines colour grading and film texture (halation, grain, bloom, aberration, shake) in one pass.
* You’re a **developer** building an app that needs film effects programmatically.
## When to use alternatives
[Section titled “When to use alternatives”](#when-to-use-alternatives)
* You need **real-time preview inside your NLE**: Colourlab AI, Dehancer, and FilmBox integrate directly into Premiere, Resolve, and Final Cut as plugins.
* You want **AI auto-grading and shot matching**: Colourlab AI balances and matches shots across a timeline for you.
* You want a **larger library of film stocks**: Dehancer and FilmBox offer more stock emulations.
* You need **per-clip adjustments within a timeline**: NLE plugins let you tweak each clip on the timeline without round-tripping.
## What about AI color tools?
[Section titled “What about AI color tools?”](#what-about-ai-color-tools)
Hance can be AI-driven too. The [`/hance` agent skill](/docs/agent/overview/) runs a render, read, adjust loop: it picks looks and tunes parameters by inspecting preview stills.
Other tools use AI for color in different shapes:
* **[Colourlab AI](https://colourlab.ai/)** (in the table above) auto-balances and matches shots inside an NLE, locally.
* **[Imagen](https://imagen-ai.com/video/)** goes further into automation. It is a cloud auto-editor: you upload footage and a hosted model makes the grading and editing calls for you.
The real difference isn’t “AI or not.” It’s **how you run it**:
* Hance is a headless CLI and agent that runs upstream of any editor.
* It is scriptable and batchable, with no GUI or timeline required.
* It bundles a broader film-texture set (halation, bloom, aberration, shake) alongside grading and grain in one pass.
Reach for a GUI colorist app when you’re grading shot-by-shot inside an NLE. Reach for hance when you want grading and texture applied programmatically, in batch, or by an agent.
# Installation
> How to install hance.
The only system requirement is FFmpeg (see [below](#requirements)).
## Run with npx (no install)
[Section titled “Run with npx (no install)”](#run-with-npx-no-install)
The quickest way to try hance, no install step, on macOS or Linux:
```bash
npx @orva-studio/hance video.mp4
```
This downloads and runs the latest hance on demand. Swap `npx` for `bunx` if you use [Bun](https://bun.sh).
FFmpeg required
hance needs **FFmpeg** (and `ffprobe`) on your PATH: `brew install ffmpeg`, `apt install ffmpeg`, or see [Requirements](#requirements). Without it, hance exits with an error. (`/hance setup` checks this for you.)
## With an AI agent
[Section titled “With an AI agent”](#with-an-ai-agent)
Install the skill into your agent with [skills.sh](https://skills.sh):
```bash
npx skills add orva-studio/hance
```
This registers the `/hance` skill so your agent can drive hance in plain English. Then run the setup command, which verifies FFmpeg and gets you ready in one step:
```plaintext
> /hance setup
```
Harnesses that don’t use skills.sh can read the same instructions straight from the CLI at runtime — no install — via `bunx @orva-studio/hance skills`. See [AI Agent Usage](/docs/agent/overview/) for details.
## Install a persistent binary
[Section titled “Install a persistent binary”](#install-a-persistent-binary)
For frequent CLI use, install `hance` to your PATH so you don’t re-download it each run:
```bash
curl -fsSL https://hance.video/install.sh | sh
```
This installs `hance` and its GPU sidecar to `~/.hance/bin`. The installer detects macOS (arm64/x64) or Linux (x64/arm64). No Bun, Rust, or Node required.
## Requirements
[Section titled “Requirements”](#requirements)
Hance requires **FFmpeg** and **ffprobe** on your system.
### macOS
[Section titled “macOS”](#macos)
```bash
brew install ffmpeg
```
### Linux
[Section titled “Linux”](#linux)
```bash
sudo apt install ffmpeg
```
Note
Windows is not currently supported; hance ships binaries for macOS (arm64/x64) and Linux (x64/arm64) only.
## Verify
[Section titled “Verify”](#verify)
```bash
hance --version
```
# Introduction
> What hance is and how it works.
Caution
Hance is alpha software. It has mainly been tested on macOS by a single developer. Expect rough edges on Linux, and pin versions if you use it in anything important. Windows is not supported.
Using an AI agent?
These docs are machine-readable: point your agent at [`/llms.txt`](/llms.txt), or append `.md` to any page URL for raw Markdown. See [AI Agent Usage](/docs/agent/overview/#machine-readable-docs).
Hance is a single-binary CLI that applies cinematic film effects to video and images. Preview a look in the browser with `hance ui`, then batch-apply it from the CLI. GPU-accelerated colour, halation, bloom, grain, vignette, split-tone, aberration, and camera shake. One binary, no plugins, no subscriptions.
## Who is this for?
[Section titled “Who is this for?”](#who-is-this-for)
* **Creators whose editors don’t support LUTs**: CapCut, ScreenFlow, iMovie, browser-based editors, and mobile NLEs have no LUT pipeline. Hance gives you cinematic film looks that weren’t possible before. Process your clips before you import them.
* **Creators who want more than a LUT**: halation, grain, bloom, aberration, and camera shake are spatial effects that LUTs literally cannot do. Hance bundles colour grading and film texture into one step, no plugins required.
* **Automation pipelines**: agencies, studios, or platforms that need to batch-apply a consistent look across hundreds of clips with no GUI in the loop.
* **Developers** building apps that need film effects programmatically: social video platforms, AI video pipelines, content tools.
Hance is not a replacement for professional colour grading. It’s the tool you reach for when you don’t want to open a colour grading app at all.
## How it works
[Section titled “How it works”](#how-it-works)
Run `hance` on any video or image file and it applies a chain of film effects in a single pass:
```bash
hance video.mp4
```
This produces `video_hanced.mp4` next to the original, with the default film look applied.
## Effects pipeline
[Section titled “Effects pipeline”](#effects-pipeline)
Every file passes through these stages:
1. **Color grading**: exposure, contrast, white balance, saturation, fade
2. **Halation**: soft glow around highlights (a real film optical artifact)
3. **Chromatic aberration**: subtle color fringing at edges
4. **Bloom**: soft light diffusion
5. **Film grain**: organic noise with controllable size and softness
6. **Vignette**: darkened edges
7. **Split toning**: color shifts in shadows and highlights
8. **Camera shake**: subtle motion for a handheld feel
Each effect can be tuned individually via CLI flags, or disabled entirely with `--no-`.
## Looks
[Section titled “Looks”](#looks)
Hance ships with 40+ built-in looks modeled after real film stocks: Portra 400, Cinestill 800T, Kodachrome 64, and more. Apply one with:
```bash
hance video.mp4 --preset portra-400
```
You can also create and share your own `.hlook` files.
## License
[Section titled “License”](#license)
Hance is licensed under [FSL-1.1-Apache-2.0](https://github.com/Orva-Studio/hance/blob/main/LICENSE): free to use, modify, and redistribute. Cannot be used to build a competing product or service. Converts to Apache 2.0 on April 1, 2028.
# Quick Start
> Get your first hanced video in under a minute.
## Basic usage
[Section titled “Basic usage”](#basic-usage)
Apply the default film look to a video:
```bash
hance video.mp4
```
Output: `video_hanced.mp4`
## Choose a look
[Section titled “Choose a look”](#choose-a-look)
Apply a specific film stock:
```bash
hance video.mp4 --preset cinestill-800t
```
## Custom output path
[Section titled “Custom output path”](#custom-output-path)
```bash
hance video.mp4 -o output.mp4
```
## Tweak individual effects
[Section titled “Tweak individual effects”](#tweak-individual-effects)
Override any parameter on top of a preset:
```bash
hance video.mp4 --preset portra-400 --grain-amount 0.3 --vignette-amount 0.5
```
## Disable an effect
[Section titled “Disable an effect”](#disable-an-effect)
```bash
hance video.mp4 --no-grain --no-vignette
```
## Process an image
[Section titled “Process an image”](#process-an-image)
Hance auto-detects images and processes them the same way:
```bash
hance photo.jpg
```
Output: `photo_hanced.jpg`
## Export quality presets
[Section titled “Export quality presets”](#export-quality-presets)
For higher quality output:
```bash
hance video.mp4 --export high
```
Available presets: `low`, `medium`, `high`, `max`.
## Open the UI
[Section titled “Open the UI”](#open-the-ui)
Hance includes a browser-based editor:
```bash
hance ui
```
Or open it with a file pre-loaded:
```bash
hance ui video.mp4
```
# Built-in Looks
> The 40+ film stock looks that ship with hance.
Hance ships with looks modeled after real film stocks. Apply any with `--preset `.
## Color negative
[Section titled “Color negative”](#color-negative)
| Look | Film stock |
| ---------------- | ----------------------------- |
| `colorplus-200` | Kodak ColorPlus 200 |
| `ektar-100` | Kodak Ektar 100 |
| `fuji-pro-400h` | Fuji Pro 400H |
| `fujicolor-200` | Fujicolor C200 |
| `gold-200` | Kodak Gold 200 |
| `ilfocolor-400` | Ilford Ilfocolor 400 |
| `lomo-color-100` | Lomography Color Negative 100 |
| `portra-400` | Kodak Portra 400 |
| `portra-800` | Kodak Portra 800 |
| `proimage-100` | Kodak ProImage 100 |
| `superia-400` | Fuji Superia 400 |
| `ultramax-400` | Kodak Ultramax 400 |
| `vista-200` | Agfa Vista 200 |
| `vista-400` | Agfa Vista 400 |
| `venus-800` | Lomography Color Negative 800 |
## Slide / reversal
[Section titled “Slide / reversal”](#slide--reversal)
| Look | Film stock |
| --------------- | ------------------- |
| `ektachrome` | Kodak Ektachrome |
| `kodachrome-64` | Kodak Kodachrome 64 |
| `provia-100f` | Fuji Provia 100F |
| `velvia-50` | Fuji Velvia 50 |
| `acros-100ii` | Fuji Acros 100 II |
## Black & white
[Section titled “Black & white”](#black--white)
| Look | Film stock |
| ---------------- | ---------------------- |
| `delta-3200` | Ilford Delta 3200 |
| `fomapan-400` | Foma Fomapan 400 |
| `hp5` | Ilford HP5 Plus |
| `ortho-80` | Rollei Ortho 80 |
| `sfx-200` | Ilford SFX 200 |
| `streetpan-400` | Silberra Streetpan 400 |
| `tri-x-400` | Kodak Tri-X 400 |
| `xp2-400` | Ilford XP2 Super 400 |
| `cinestill-bwxx` | CineStill BwXX |
## Cinema
[Section titled “Cinema”](#cinema)
| Look | Film stock |
| ---------------- | ------------------ |
| `cinestill-50d` | CineStill 50D |
| `cinestill-400d` | CineStill 400D |
| `cinestill-800t` | CineStill 800T |
| `vision3-250d` | Kodak Vision3 250D |
| `vision3-500t` | Kodak Vision3 500T |
## Specialty
[Section titled “Specialty”](#specialty)
| Look | Description |
| --------------------- | ----------------------------------------- |
| `aerocolor-100` | Kodak Aerocolor (aerial photography film) |
| `bleach-bypass` | Bleach bypass processing effect |
| `centuria-200` | Konica Centuria 200 |
| `holga-400` | Holga toy camera aesthetic |
| `lomography-redscale` | Lomography Redscale |
| `polaroid-sx70` | Polaroid SX-70 |
## Usage
[Section titled “Usage”](#usage)
```bash
hance video.mp4 --preset cinestill-800t
hance video.mp4 --preset portra-400 --grain-amount 0.3
```
List all available looks:
```bash
hance preset list
```
# Custom Looks
> Create and share your own .hlook files.
## The `.hlook` format
[Section titled “The .hlook format”](#the-hlook-format)
A `.hlook` file is a JSON file containing effect parameters:
```json
{
"hance_version": "0.3.1",
"name": "My Look",
"description": "Warm faded vintage feel",
"keywords": ["warm", "faded", "vintage"],
"params": {
"exposure": 0.1,
"contrast": 1.1,
"fade": 0.15,
"white-balance": 5500,
"subtractive-sat": 0.85,
"halation-amount": 0.35,
"grain-amount": 0.2,
"grain-size": 1,
"vignette-amount": 0.35
}
}
```
Only include parameters you want to change from the default. Anything omitted falls back to the default look.
### Input LUT
[Section titled “Input LUT”](#input-lut)
A look can also carry an input LUT via a top-level `preLut` field (a sibling of `params`, not inside it). This applies a pre-grade conversion before the look’s other effects:
```json
{
"name": "V-Log Base",
"preLut": "vlog",
"params": {
"contrast": 1.05
}
}
```
Accepted values are `rec709` (default, pass-through) and `vlog` (Panasonic V-Log → Rec.709).
## Where to put looks
[Section titled “Where to put looks”](#where-to-put-looks)
Hance searches for looks in two directories:
1. **User looks**: `~/.hance/presets/`
2. **Built-in looks**: ships with the binary
User looks take precedence over built-in looks with the same name.
## Using a custom look
[Section titled “Using a custom look”](#using-a-custom-look)
Save your `.hlook` file to `~/.hance/presets/` and reference it by name:
```bash
hance video.mp4 --preset my-look
```
## Creating a look from the UI
[Section titled “Creating a look from the UI”](#creating-a-look-from-the-ui)
Use `hance ui` to dial in your settings visually, then export the look as a `.hlook` file.
## Sharing looks
[Section titled “Sharing looks”](#sharing-looks)
`.hlook` files are plain JSON and can be shared, version-controlled, or distributed as part of a project. Drop them in `~/.hance/presets/` on any machine.
# Default Look
> What hance applies when you don't specify a preset.
When you run `hance video.mp4` without `--preset`, hance loads the built-in `default` look. This is a balanced cinematic starting point, not a neutral pass-through.
## What the default look does
[Section titled “What the default look does”](#what-the-default-look-does)
| Effect | Setting | What it does |
| ------------------------ | ---------------------- | ----------------------------------------------------------- |
| **Color** | All neutral | No color shift: exposure 0, contrast 1, white balance 6500K |
| **Halation** | 0.25 amount, radius 4 | Subtle warm glow around highlights |
| **Chromatic aberration** | 0.3 | Slight color fringing at edges |
| **Bloom** | 0.25 amount, radius 10 | Gentle light diffusion |
| **Grain** | 0.125 amount | Light organic noise |
| **Vignette** | 0.25 amount, 0.25 size | Mild edge darkening |
| **Split tone** | 0 amount | Disabled (amount is zero) |
| **Camera shake** | 0.25 amount, 0.5 rate | Subtle handheld motion |
## The default look is not “no effect”
[Section titled “The default look is not “no effect””](#the-default-look-is-not-no-effect)
Even with neutral color settings, the optical effects (halation, aberration, bloom, grain, vignette, camera shake) are all active. To get a clean pass-through, disable them:
```bash
hance video.mp4 --no-halation --no-aberration --no-bloom --no-grain --no-vignette --no-camera-shake
```
## Overriding the default
[Section titled “Overriding the default”](#overriding-the-default)
Any preset you choose replaces the default as the base. CLI flags then override on top:
```bash
# portra-400 as base, with extra grain
hance video.mp4 --preset portra-400 --grain-amount 0.3
```
# Animation Pipelines
> Add film texture to Remotion, Manim, and FFmpeg renders by piping their output through hance.
Programmatic animation tools produce clean, sterile output, exactly what film texture fixes. Because hance operates on any standard video file, it slots in as a post-processing step after your render: grade the colour and add halation, grain, and bloom that no LUT can reproduce.
The pattern is always the same: render with your tool, then run hance on the file it produced:
```bash
hance --preset --export high
```
Output is written alongside the input with a `_hanced` suffix (e.g. `out.mp4` → `out_hanced.mp4`), or wherever you point `-o`.
## Remotion
[Section titled “Remotion”](#remotion)
Remotion writes to `out/video.mp4` by default (or the path you pass to `--output`):
```bash
npx remotion render src/index.ts MyComp out/video.mp4
hance out/video.mp4 --preset cinestill-800t --export high -o final.mp4
```
## Manim
[Section titled “Manim”](#manim)
There are two Manim projects with different commands; point hance at whichever file your build produced.
**Manim Community** (`pip install manim`) writes to `media/videos///.mp4`:
```bash
manim -qh scene.py MyScene
hance media/videos/scene/1080p60/MyScene.mp4 --preset portra-400 -o MyScene_film.mp4
```
**ManimGL** ([3b1b/manim](https://github.com/3b1b/manim)) uses `manimgl` with `-w` to write a file; the output directory is set in your `custom_config.yml`:
```bash
manimgl scene.py MyScene -w
hance /MyScene.mp4 --preset portra-400 -o MyScene_film.mp4
```
Tip
Animation renders are often crisp and high-contrast. A subtle look reads better than a heavy one: start with a low grain amount and a gentle halation, then build up:
```bash
hance render.mp4 --preset portra-400 --grain-amount 0.2 --halation-amount 0.3
```
## Raw FFmpeg output
[Section titled “Raw FFmpeg output”](#raw-ffmpeg-output)
Any file FFmpeg can produce, hance can grade; there’s nothing tool-specific about it:
```bash
ffmpeg -i frames/%04d.png -c:v libx264 -pix_fmt yuv420p render.mp4
hance render.mp4 --preset kodachrome-64
```
## Batch a sequence of renders
[Section titled “Batch a sequence of renders”](#batch-a-sequence-of-renders)
If your pipeline emits many clips, apply one consistent look across all of them in a single command:
```bash
hance renders/*.mp4 --preset portra-400 -o ./graded/
```
Note
Batch processing (multiple inputs in one command) requires a Pro license. On the free tier, process one file at a time. See [Free vs Pro](/docs/free-vs-pro/).